Entering Data in the Data Grid
A data grid can be used to enter data for inspection characteristics. The system then assigns a result for the characteristic based on the data entered. If the Inspect All Sample Size policy is enabled in the inspection, then the data grid must be used to determine the result of the characteristic inspections. If the Inspect All Sample Size policy is not enabled for the inspection, then using the data grid is optional and a result for the characteristic can be entered manually. If a result is manually entered and then the data is also entered in the grid, then the system will override the manually entered result and update it to reflect the result of the data entered in the grid. Data is entered into the grid as follows:
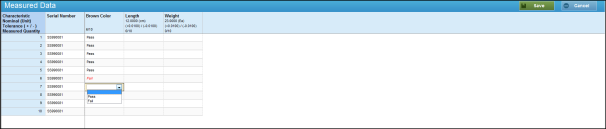
- Attribute - Pass or Fail is selected in each cell for each characteristic.
- Variable - Measurement data is entered in each cell for each characteristic. Based on the data entered, each cell is calculated to determine a pass or fail value. This is applicable to characteristic with type variable as it has nominal and tolerance.
Upon completion of entering measurement data (all sample size must be entered), the characteristic result will be determined based on the Maximum Reject Quantity.
Sample Data Grid
- Once the data grid is launched by clicking the Enter Data button at the bottom of the Perform Inspection task:
- If the Inspect All Sample Size policy is set to No, then a blank data grid will be displayed the first time the data grid is launched from the inspection. The user must then click the Start button to populate the data grid with the applicable information.
- If the Inspect All Sample Size policy is set to Yes, then the data grid will be populated with all applicable information when it is launched.
NOTE: Serial numbers only transfer to the data grid from the receipt if the number of receipt serial numbers matches the sample size. Otherwise, the numbers must be manually entered.
- Complete the data grid.
- Click the Save button and then click the Cancel button.
Result: The results are displayed in the Perform Inspection window.
See Also
Creating a Rework or Random Inspection